© 2025 HAFİF BİLGİLER. Created for free using WordPress and Kubio
Gitlab and Gitlab Runner Installation will be explained under this topic. This installation tried on the kubernetes cluster which has a one worker node. Also if you have multiple worker node you can use the node selector to run application on the specific worker node. If you decide to use node selector you must create the mount folder under the selected node.
In there,we will use persistent volume, persistent volume claim, deployment and service resources. Also we will use nginx reverse proxy and self signed certificate, to connect gitlab application after created all kubernetes resources. And We can use the ingrees to acces the our applicaiton.
You can follow below commands;
Step1:
Create mount folder under your selected worker node and create yaml file for persistent volume and volume claim. If you want to use the node selector for deployment you must add label on your node and you should edit the your deployment yaml file.
mkdir -p /opt/gitlab/logs /opt/gitlab/data /opt/gitlab/config
vim gitlabpv.yaml
apiVersion: v1
kind: PersistentVolume
metadata:
name: gitlabcnfgpv
spec:
capacity:
storage: 1Gi
accessModes:
- ReadWriteOnce
hostPath:
path: "/opt/gitlab/config"
---
apiVersion: v1
kind: PersistentVolume
metadata:
name: gitlablgspv
spec:
capacity:
storage: 1Gi
accessModes:
- ReadWriteOnce
hostPath:
path: "/opt/gitlab/logs"
---
apiVersion: v1
kind: PersistentVolume
metadata:
name: gitlabdtpv
spec:
capacity:
storage: 1Gi
accessModes:
- ReadWriteOnce
hostPath:
path: "/opt/gitlab/data"
kubectl apply -f gilabpv.yaml
vim gitlabpvc.yaml
apiVersion: v1
kind: PersistentVolumeClaim
metadata:
name: gitlabcnfpvc
spec:
accessModes:
- ReadWriteOnce
resources:
requests:
storage: 1Gi
---
apiVersion: v1
kind: PersistentVolumeClaim
metadata:
name: gitlablgspvc
spec:
accessModes:
- ReadWriteOnce
resources:
requests:
storage: 1Gi
---
apiVersion: v1
kind: PersistentVolumeClaim
metadata:
name: gitlabdtpvc
spec:
accessModes:
- ReadWriteOnce
resources:
requests:
storage: 1Gi
kubectl create -f gitlabpvc.yaml
Then, check your pv and pvc resources.
kubectl get pv
Then, we can see our pv and pvc resources above picture. PVC resources bounded with the PV resources.
Step2:
Create deployment file after the node labeled. We suppose the we have multiple worker node and we choose the specific node to run the gitlab application.
kubectl label nodes <worker-node-name> app=gitlab
vim gitlab.yaml
apiVersion: apps/v1
kind: Deployment
metadata:
name: gitlab
labels:
app: gitlab
spec:
replicas: 1
selector:
matchLabels:
app: gitlab
template:
metadata:
labels:
app: gitlab
spec:
hostAliases:
- ip: "your_ip_address"
hostnames:
- gitlab-ingress.<your_ip_address>.nip.io
containers:
- name: gitlab
image: gitlab/gitlab-ee:latest
ports:
- name: http
containerPort: 80
- name: https
containerPort: 443
- name: ssh
containerPort: 22
volumeMounts:
- mountPath: "/etc/gitlab"
name: gitlabconfig
- mountPath: "/var/log/gitlab"
name: gitlablogs
- mountPath: "/var/opt/gitlab"
name: gitlabdata
volumes:
- name: gitlabconfig
persistentVolumeClaim:
claimName: gitlabcnfpvc
- name: gitlablogs
persistentVolumeClaim:
claimName: gitlablgspvc
- name: gitlabdata
persistentVolumeClaim:
claimName: gitlabdtpvc
nodeSelector:
app: gitlab
kubectl create -f gitlab.yaml
Now we should go to worker node which gitlab is running and Open mount folder and add below lines for server url address.
vim /opt/gitlab/config/gitlab.rb
external_url "http://gitlab-ingress.<192.168.56.111>.nip.io"
Then you must use below command to reconfigure gitlab.
pod=$(kubectl get pods | awk '{print $1}' | grep -e "gitlab")
kubectl exec -it $pod bash
gitlab-ctl reconfigure
exit
Step3:
Create Service file to establish the connection for gitlab application.
vim gitlabsvc.yaml
apiVersion: v1
kind: Service
metadata:
name: gitlab
labels:
app: gitlab
spec:
ports:
- port: 80
name: http
protocol: TCP
- port: 443
name: https
protocol: TCP
- port: 22
name: ssh
protocol: TCP
selector:
app: gitlab
type: NodePort
kubectl create -f gitlabsvc.yaml
Now we can check the our created service and we should take the node port number to establish connection for gitlab with our browser.
kubectl get svc
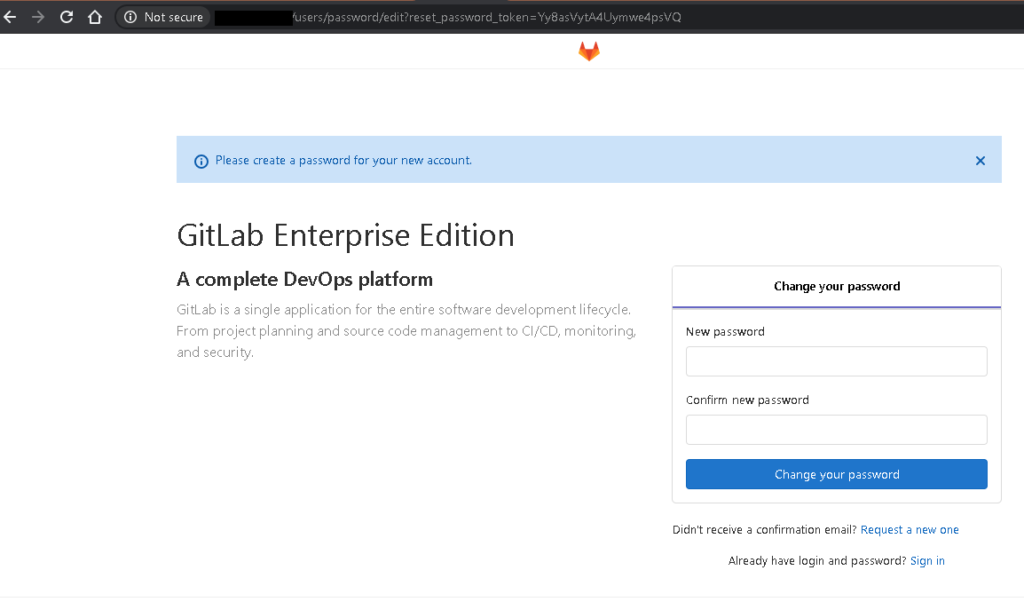
If you access the gitlab application like picture below, you must chenge the default root password with connect the pod with “exec” command and use the following lines.
pod=$(kubectl get pods | awk '{print $1}' | grep -e "gitlab")
kubectl exec -it $pod bash
gitlab-rails console
user = User.find_by(username: "root")
user.password = 'hafifbilgiler123'
user.password_confirmation = 'hafifbilgiler123'
user.save
exit
exit
Step4:
Create Self Signed Certficate, secret and Ingress yaml file Secure to access the gitlab application without to using node port ip address. Also if you don’t have a Ingress Controller, you can get a lot of information about the Nginx Controller Installation to click here. Also I have been used the nip.io for DNS solving.
openssl req -x509 -nodes -days 365 -newkey rsa:2048 -out gitlab-ingress-ssl.crt -keyout gitlab-ingress-ssl.key -subj "/CN=gitlab-ingress.<your_ip_addrress>.nip.io/O=gitlab-ingress.<your_ip_addrress>.nip.io"
kubectl create secret tls gitlab-ingress-secret --key ./gitlab-ingress-ssl.key --cert ./gitlab-ingress-ssl.crt
apiVersion: networking.k8s.io/v1
kind: Ingress
metadata:
name: gitlab-ingress
spec:
tls:
- hosts:
- gitlab-ingress.<your_ip_addrress>.nip.io
secretName: gitlab-ingress-secret
ingressClassName: nginx
rules:
- host: gitlab-ingress.<your_ip_addrress>.nip.io
http:
paths:
- backend:
service:
name: gitlab
port:
number: 80
path: /
pathType: Prefix
status:
loadBalancer: {}
vim ingress.yaml
kubectl create -f ingress.yaml
Step5:
Create volume folders and yaml files for persistentent volume and persistent volume claim.
mkdir -p /opt/gitlab/gitlab-runner/config /opt/gitlab/gitlab-runner/docker.sock /opt/gitlab/gitlab-runner/SSL
vim gitlabrunner_pv_pvc.yaml
apiVersion: v1
kind: PersistentVolume
metadata:
name: gitlabrunnercnfgpv
spec:
capacity:
storage: 1Gi
accessModes:
- ReadWriteOnce
hostPath:
path: "/opt/gitlab/gitlab-runner/config"
---
apiVersion: v1
kind: PersistentVolumeClaim
metadata:
name: gitlabrunnercnfgpvc
spec:
accessModes:
- ReadWriteOnce
resources:
requests:
storage: 1Gi
---
apiVersion: v1
kind: PersistentVolume
metadata:
name: gitlabrunnerdockerpv
spec:
capacity:
storage: 1Gi
accessModes:
- ReadWriteOnce
hostPath:
path: "/opt/gitlab/gitlab-runner/docker.sock"
---
apiVersion: v1
kind: PersistentVolumeClaim
metadata:
name: gitlabrunnerdockerpvc
spec:
accessModes:
- ReadWriteOnce
resources:
requests:
storage: 1Gi
---
apiVersion: v1
kind: PersistentVolume
metadata:
name: gitlabrunnerssl
spec:
capacity:
storage: 1Gi
accessModes:
- ReadWriteOnce
hostPath:
path: "/opt/gitlab/gitlab-runner/SSL"
---
apiVersion: v1
kind: PersistentVolumeClaim
metadata:
name: gitlabrunnerssl
spec:
accessModes:
- ReadWriteOnce
resources:
requests:
storage: 1Gi
kubectl create -f gitlabrunner_pv_pvc.yaml
Step6:
Create yaml file for gitlab runner application.
vim gitlabrunner.yaml
apiVersion: apps/v1
kind: Deployment
metadata:
name: gitlab-runner
labels:
app: gitlab-runner
spec:
replicas: 1
selector:
matchLabels:
app: gitlab-runner
template:
metadata:
labels:
app: gitlab-runner
spec:
hostAliases:
- ip: "your-ip-address"
hostnames:
- gitlab-ingress.your-ip-address
containers:
- name: gitlab-runner
image: gitlab/gitlab-runner:latest
#command: ['sh', '-c', 'mkdir /opt/SSL']
ports:
- name: http
containerPort: 80
- name: https
containerPort: 443
- name: ssh
containerPort: 22
volumeMounts:
- mountPath: "/etc/gitlab-runner"
name: config
- mountPath: "/var/run/docker.sock"
name: dockersock
- mountPath: "/opt/SSL"
name: sslcertificate
volumes:
- name: config
persistentVolumeClaim:
claimName: gitlabrunnercnfgpvc
- name: dockersock
persistentVolumeClaim:
claimName: gitlabrunnerdockerpvc
- name: sslcertificate
persistentVolumeClaim:
claimName: gitlabrunnerssl
nodeSelector:
app2: gitlab-runner
kubectl create -f gitlabrunner.yaml
Step7:
Now We can test it. Create basic project with echo messages and some steps. Create bash Template .gitlab-ci.yml file for this project on gitlab like below. Take your ip address and token from project CI/CD Settings. And you must write your gitlab url address with https.
Step8:
Go to your worker node which Gitlab-Runner running and put your certificate under volume path “/opt/gitlab/gitlab-runner/SSL”. Then you will use the this certficate for trusted connection during gitlab runner register.
pod=$(kubectl get pods | awk '{print $1}' | grep -e "gitlab")
kubectl exec -it $pod bash
gitlab-runner register --tls-ca-file=/opt/SSL/gitlab-ingress-ssl.crt
Step9:
Then, you can check the your project if it does register or does not from under CI / CD Settings.
That’s it. If you need to run bash command or other scripts on remote computer you can add gitlab runner as a container like above steps.
CATEGORIES:
Tags:
© 2025 HAFİF BİLGİLER. Created for free using WordPress and Kubio
No responses yet