
Bookstack Install On Kubernetes
INFO: This work has been tried on one node. This application running kubernetes master node. If you are going to try this on a cluster with multiple nodes, you have to open the mount folders on that worker node. You need to use node selector to determine which node to pod will be created on. I will not telling node selector issue here.
If you want bookstack applications running on kubernetes you should follow the below steps. If you have not a docker user, you must create a docker user. Also you have a docker group you adding docker user in docker group.
For create a docker user;
useradd dockerFor adding docker user in docker group;
useradd -g docker dockerAfter above steps you save the id docker user because you will use in yaml file.
id docker
Step1:
You must create new deployment yaml file and edit some below. I wrote the yaml file there, but we will use the this file after all steps because we will must get ip address.
vim bookstack.yamlapiVersion: apps/v1
kind: Deployment
metadata:
name: bookstack
labels:
app: bookstack
spec:
replicas: 1
selector:
matchLabels:
app: bookstack
template:
metadata:
labels:
app: bookstack
spec:
containers:
- name: bookstack
image: linuxserver/bookstack
ports:
- containerPort: 80
env:
- name: PUID
value: "1000"
- name: PGID
value: "986"
- name: DB_HOST
value: "bookstack_db"
- name: DB_USER
value: "bookstack"
- name: DB_PASS
value: "bookstack"
- name: DB_DATABASE
value: "bookstack"
volumeMounts:
- mountPath: "/config"
name: bokstackvolume
volumes:
- name: bokstackvolume
persistentVolumeClaim:
claimName: bookstackpvc
If you should done it, you should wait to end all steps . Because you must create a persistentet volume and volume claim of kubernetes resources and all items.Then after you should take db pod IP address and write in deployment yaml file. For this you should follow the below steps.
Step2:
vim bokstackpv.yamlapiVersion: v1
kind: PersistentVolume
metadata:
name: bookstackpv
labels:
type: local
spec:
capacity:
storage: 1Gi
accessModes:
- ReadWriteOnce
hostPath:
path: "/opt/bookstack"Then after:
mkdir /opt/bookstackkubectl create -f bookstackpv.yamlkubectl get pv
Then after;
vim bookstackpvc.yamlapiVersion: v1
kind: PersistentVolumeClaim
metadata:
name: bookstackpvc
spec:
accessModes:
- ReadWriteOnce
resources:
requests:
storage: 1Gikubectl create -f bookstackpvc.yamlThis pvc resorces otomaticly bounded on pv resorces.
kubectl get pvc
Then after you create yaml file for bookstack database. Following below steps;
Step3:
vim bookstackdb.yamlapiVersion: apps/v1
kind: Deployment
metadata:
name: bookstackdb
labels:
app: bookstackdb
spec:
replicas: 1
selector:
matchLabels:
app: bookstackdb
template:
metadata:
labels:
app: bookstackdb
spec:
containers:
- name: bookstackdb
image: linuxserver/mariadb
ports:
- containerPort: 3306
env:
- name: PUID
value: "1001"
- name: PGID
value: "986"
- name: MYSQL_ROOT_PASSWORD
value: "bookstack"
- name: MYSQL_DATABASE
value: "bookstack"
- name: MYSQL_USER
value: "bookstack"
- name: MYSQL_PASSWORD
value: "bookstack"
- name: TZ
value: "Europe/London"
volumeMounts:
- mountPath: "/config"
name: bokstackdbvolume
volumes:
- name: bokstackdbvolume
persistentVolumeClaim:
claimName: bookstackdbpvcThen after you must create yaml file for db pv and pvc as below.
Step4:
vim bookstackdbpv.yamlapiVersion: v1
kind: PersistentVolume
metadata:
name: bookstackdbpv
labels:
type: local
spec:
capacity:
storage: 1Gi
accessModes:
- ReadWriteOnce
hostPath:
path: "/opt/bookstackdb"mkdir /opt/bookstackdbkubectl create -f bookstackdbpv.yamlkubectl get pv
vim bookstackdbpvc.yamlapiVersion: v1
kind: PersistentVolumeClaim
metadata:
name: bookstackdbpvc
spec:
accessModes:
- ReadWriteOnce
resources:
requests:
storage: 1Gikubectl create -f bookstackdbpvc.yaml
Then after you should create a bookstackdb deployment resorces of kubernetes.
kubectl create -f bookstackdb.yamlThen after, let’s list of the pods and look at the status of the pods;
kubectl get pods
kubectl logs bookstackdb-5d86557d85-p2gdf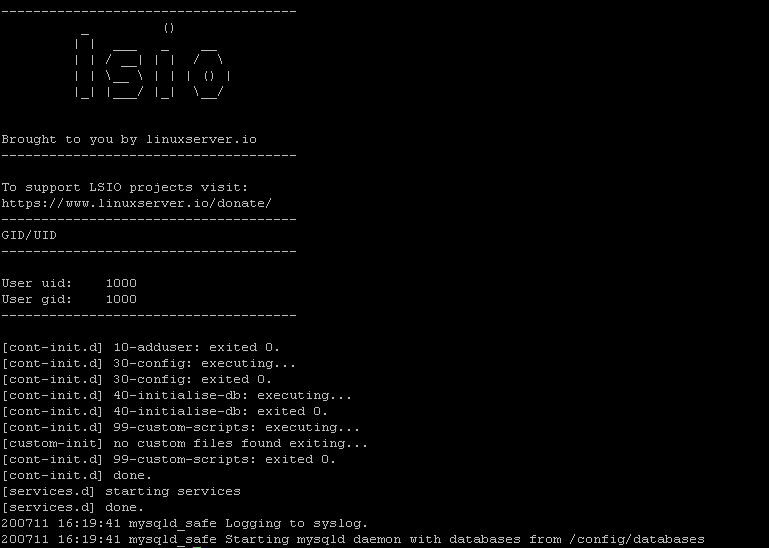
The db deployment and pod was successfuly as the above picture. Then after we must list in detail pod for take ip adress.
kubectl get pods -o wide 
Step5:
Let’s edit the bokstack deployment yaml file and add above ip address.
vim bookstack.yamlapiVersion: apps/v1
kind: Deployment
metadata:
name: bookstack
labels:
app: bookstack
spec:
replicas: 1
selector:
matchLabels:
app: bookstack
template:
metadata:
labels:
app: bookstack
spec:
containers:
- name: bookstack
image: linuxserver/bookstack
ports:
- containerPort: 80
env:
- name: PUID
value: "1001"
- name: PGID
value: "986"
- name: DB_HOST
value: "10.244.0.86"
- name: DB_USER
value: "bookstack"
- name: DB_PASS
value: "bookstack"
- name: DB_DATABASE
value: "bookstack"
volumeMounts:
- mountPath: "/config"
name: bokstackvolume
volumes:
- name: bokstackvolume
persistentVolumeClaim:
claimName: bookstackpvcStep6:
You must create service for connect to bookstack application. I used nodeport here. You must stop the firewalld or adding port in firewall.
systemctl stop firewalldvim bookstacksvc.yamlapiVersion: v1
kind: Service
metadata:
name: bookstack
labels:
app: bookstack
spec:
ports:
- port: 80
protocol: TCP
selector:
app: bookstack
type: NodePortkubectl create -f bookstacksvc.yamlkubectl get svc
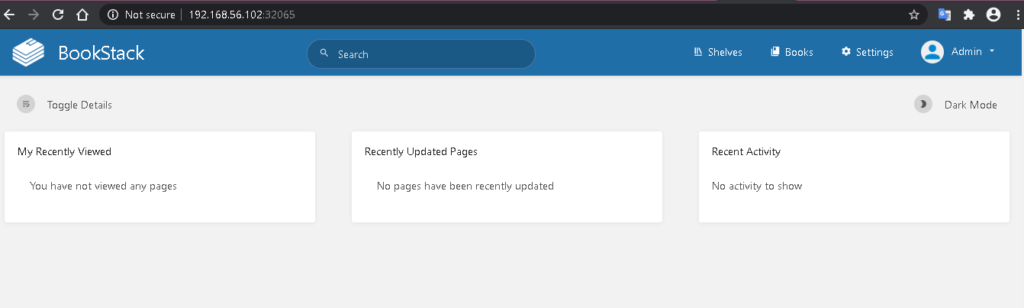
We can connect through the browser now.
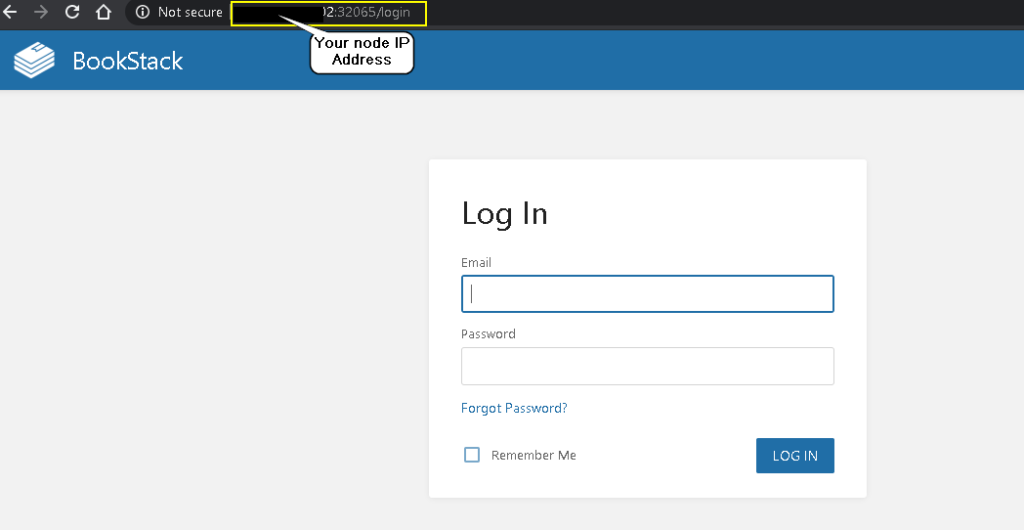
Default Login email and password;
Email: admin@admin.com
Password: password
GITLAB INSTALL ON KUBERNETES
Gitlab installation will be explained under this topic. This installation did on kubernetes master node. Also if you have multiple node you should use node selector and you must create mount folder under selected node. We will use persistent volume, persistent volume claim, deployment and service resources in there. Also we will use nginx reverse proxy and self signed certificate, for connect gitlab application after created all kubernetes resources.
You must follow below commands;
Step1:
Create persistent volume kubernetes resources so we should do create yaml file and create, but before this step, you must create volume folders under node,
mkdir -p /opt/gitlab/logs /opt/gitlab/data /opt/gitlab/configvim gitlabpv.yamlapiVersion: v1
kind: PersistentVolume
metadata:
name: gitlabcnfgpv
spec:
capacity:
storage: 1Gi
accessModes:
- ReadWriteOnce
hostPath:
path: "/opt/gitlab/config"
---
apiVersion: v1
kind: PersistentVolume
metadata:
name: gitlablgspv
spec:
capacity:
storage: 1Gi
accessModes:
- ReadWriteOnce
hostPath:
path: "/opt/gitlab/logs"
---
apiVersion: v1
kind: PersistentVolume
metadata:
name: gitlabdtpv
spec:
capacity:
storage: 1Gi
accessModes:
- ReadWriteOnce
hostPath:
path: "/opt/gitlab/data"
kubectl create -f gitlabpv.yamlStep2:
Create persistent volume claim kubernetes resources;
vim gitlabpvc.yamlapiVersion: v1
kind: PersistentVolumeClaim
metadata:
name: gitlabcnfpvc
spec:
accessModes:
- ReadWriteOnce
resources:
requests:
storage: 1Gi
---
apiVersion: v1
kind: PersistentVolumeClaim
metadata:
name: gitlablgspvc
spec:
accessModes:
- ReadWriteOnce
resources:
requests:
storage: 1Gi
---
apiVersion: v1
kind: PersistentVolumeClaim
metadata:
name: gitlabdtpvc
spec:
accessModes:
- ReadWriteOnce
resources:
requests:
storage: 1Gikubectl create -f gitlabpvc.yamlThen after check pv and pvc kubernetes resources.kubectl get pv
Step3:
Create deployment for gitlab application,you can use nodeselector but befeore use nodeselector you must add label on worker node you want;
kubectl label nodes <worker-node-name> app=gitlabvim gitlab.yamlapiVersion: apps/v1
kind: Deployment
metadata:
name: gitlab
labels:
app: gitlab
spec:
replicas: 1
selector:
matchLabels:
app: gitlab
template:
metadata:
labels:
app: gitlab
spec:
containers:
- name: gitlab
image: gitlab/gitlab-ee:latest
ports:
- name: http
containerPort: 80
- name: https
containerPort: 443
- name: ssh
containerPort: 22
volumeMounts:
- mountPath: "/etc/gitlab"
name: gitlabconfig
- mountPath: "/var/log/gitlab"
name: gitlablogs
- mountPath: "/var/opt/gitlab"
name: gitlabdata
volumes:
- name: gitlabconfig
persistentVolumeClaim:
claimName: gitlabcnfpvc
- name: gitlablogs
persistentVolumeClaim:
claimName: gitlablgspvc
- name: gitlabdata
persistentVolumeClaim:
claimName: gitlabdtpvc
nodeSelector:
app: gitlabkubectl create -f gitlab.yamlStep4:
Create kubernetes services for connect gitlab application;
vim gitlabsvc.yamlapiVersion: v1
kind: Service
metadata:
name: gitlab
labels:
app: gitlab
spec:
ports:
- port: 80
name: http
protocol: TCP
- port: 443
name: https
protocol: TCP
- port: 22
name: ssh
protocol: TCP
selector:
app: gitlab
type: NodePortkubectl create -f gitlabsvc.yamlAfter creating svc, we will do test connection of gitlab application.For this we should take a node port number and write web browser with node ip address. Let’s test it;
kubectl get svc
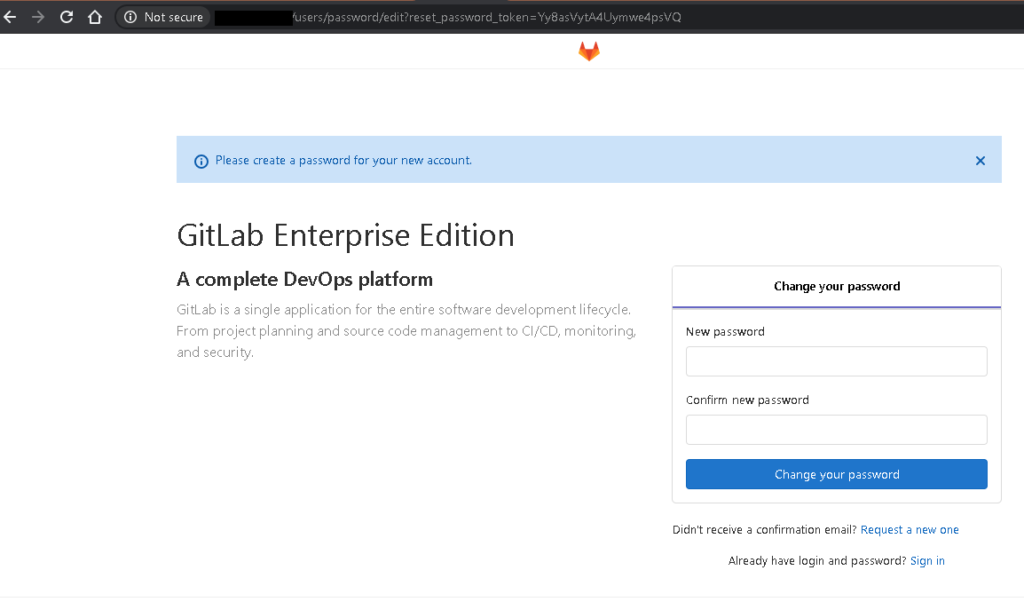
Then after you can definition new password and you use tis application. I did definition new password and I connected to the application as follows.After definition you must use username: root for connection to application .
Let’s we install gitlap-runner on kubernetes cluster.
Gitlab Runner Installation Kubernetes Cluster
While I creatd this explain I loked this site. You can look this web site.
Gitlab runner installation will be explain step by step below text. For installation we must create mount folder under worker node. We will use node selctor in deployment yaml file, so you must add label in worker node you want. Also ypu must create mount folder under worker node of you selected. Let’s we do it.
Step-1:
Should Add label worker node and create volume folder under worker node .
kubectl label node <node_name> app2=gitlab-runnermkdir -p /opt/gitlab/gitlab-runner/config /opt/gitlab/gitlab-runner/docker.sockStep-2:
Create pv and pvc kubernerntes resources yaml file.
vim gitlarunner_pv_pvc.yamlapiVersion: v1
kind: PersistentVolume
metadata:
name: gitlabrunnercnfgpv
spec:
capacity:
storage: 1Gi
accessModes:
- ReadWriteOnce
hostPath:
path: "/opt/gitlab/gitlab-runner/config"
---
apiVersion: v1
kind: PersistentVolumeClaim
metadata:
name: gitlabrunnercnfgpvc
spec:
accessModes:
- ReadWriteOnce
resources:
requests:
storage: 1Gi
---
apiVersion: v1
kind: PersistentVolume
metadata:
name: gitlabrunnerdockerpv
spec:
capacity:
storage: 1Gi
accessModes:
- ReadWriteOnce
hostPath:
path: "/opt/gitlab/gitlab-runner/docker.sock"
---
apiVersion: v1
kind: PersistentVolumeClaim
metadata:
name: gitlabrunnerdockerpvc
spec:
accessModes:
- ReadWriteOnce
resources:
requests:
storage: 1Gi
kubectl create -f gitlabrunner_pv_pvc.yamlCheck pv and pvc resources.
kubectl get pv
Step-3:
Create deployment yaml file for create gitlab runner application.
vim gitlabrunner.yamlI will continue this topic.
ELASTICSEARCH, KIBANA, FILEBEAT INSTALLATION ON KUBERNETES
You can get a lot information about site title, in this url.
Elasticsearch Install
Elasticsearch, Kibana and Filebeat installation will explain under this topic.To do this you should follow steps below.
Steps 1:
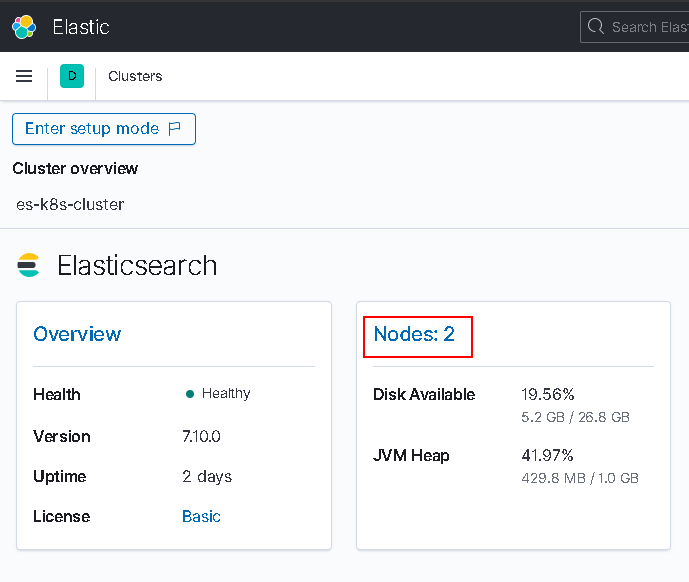
Create pv and pvc kubernetes resources. Before create pv and pvc you must create folder under your worker node. I tried this installation on the has one master and one worker node cluster. So I created specific folder under one worker node. But if you have two and more worker node you must use node selector and create folder just under your choice worker node, or you should same folder under each node. Second prefer not good choice for pratically. Also we will install has a two nodes elasticsearh cluster.
mkdir -p /opt/elasticsearch/es01 /opt/elasticsearch/es01vim elkpvpvc.yamlapiVersion: v1
kind: PersistentVolume
metadata:
name: es01pv
labels:
type: local
spec:
capacity:
storage: 1Gi
accessModes:
- ReadWriteOnce
hostPath:
path: "/opt/elasticsearch/es01"
---
apiVersion: v1
kind: PersistentVolumeClaim
metadata:
name: es01pvc
spec:
accessModes:
- ReadWriteOnce
resources:
requests:
storage: 1Gi
---
apiVersion: v1
kind: PersistentVolume
metadata:
name: es02pv
labels:
type: local
spec:
capacity:
storage: 1Gi
accessModes:
- ReadWriteOnce
hostPath:
path: "/opt/elasticsearch/es02"
---
apiVersion: v1
kind: PersistentVolumeClaim
metadata:
name: es02pvc
spec:
accessModes:
- ReadWriteOnce
resources:
requests:
storage: 1Gikubectl create -f elkpvpvc.yamlCheck the resources.
kubectl get pv
Step2:
Create service resources.
vim elksvc.yamlapiVersion: v1
kind: Service
metadata:
name: es01
labels:
app: es01
spec:
ports:
- name: rest
port: 9200
protocol: TCP
- name: internode
port: 9300
protocol: TCP
selector:
app: es01
type: NodePort
---
apiVersion: v1
kind: Service
metadata:
name: es02
labels:
app: es02
spec:
ports:
- name: rest
port: 9200
protocol: TCP
- name: internode
port: 9300
protocol: TCP
selector:
app: es02
type: NodePort kubectl create -f elksvc.yamlkubectl get svc
Step3:
Create deployment yaml file, and your service node ip write in service file.
apiVersion: apps/v1
kind: Deployment
metadata:
  name: es01
  labels:
    app: es01
spec:
  replicas: 1
  selector:
    matchLabels:
      app: es01
  template:
    metadata:
      labels:
        app: es01
   spec:
      containers:
      - name: es01
        image: docker.elastic.co/elasticsearch/elasticsearch:7.10.0
        resources:
         limits:
           cpu: 1000m
         requests:
           cpu: 100m
        ports:
        - name: req
          containerPort: 9200
          protocol: TCP
        - name: inter-node
          containerPort: 9300
          protocol: TCP
        volumeMounts:
        - mountPath: "/usr/share/elasticsearch/data"
          name: es01
        env:
        - name: cluster.name
          value: es-k8s-cluster
        - name: node.name
          value: es01
        - name: discovery.seed_hosts
          value: "10.106.67.54,10.111.128.31"
        - name: cluster.initial_master_nodes
          value: "es01,es02"
        - name: ES_JAVA_OPTS
          value: "-Xms512m -Xmx512m"
      initContainers:
      - name: fix-permissions
        image: busybox
        command: ["sh", "-c", "chown -R 1000:1000 /usr/share/elasticsearch/data"]
        volumeMounts:
        - mountPath: "/usr/share/elasticsearch/data"
          name: es01
      - name: increase-vm-max-map
        image: busybox
        command: ["sysctl", "-w", "vm.max_map_count=262144"]
        securityContext:
          privileged: true
      - name: increase-fd-ulimit
        image: busybox
        command: ["sh", "-c", "ulimit -n 65536"]
        securityContext:
          privileged: true
      volumes:
      - name: es01
        persistentVolumeClaim:
          claimName: es01pvc
---
apiVersion: apps/v1
kind: Deployment
metadata:
  name: es02
  labels:
    app: es02
spec:
  replicas: 1
  selector:
    matchLabels:
      app: es02
  template:
    metadata:
      labels:
        app: es02
    spec:
      containers:
      - name: es02
        image: docker.elastic.co/elasticsearch/elasticsearch:7.10.0
        resources:
         limits:
           cpu: 1000m
         requests:
           cpu: 100m
        ports:
        - name: req
          containerPort: 9200
          protocol: TCP
        - name: inter-node
          containerPort: 9300
          protocol: TCP
        volumeMounts:
        - mountPath: "/usr/share/elasticsearch/data"
           name: es02
        env:
        - name: cluster.name
          value: es-k8s-cluster
        - name: node.name
          value: es02
        - name: discovery.seed_hosts
          value: "10.106.67.54,10.111.128.31"
        - name: cluster.initial_master_nodes
          value: "es01,es02"
        - name: ES_JAVA_OPTS
          value: "-Xms512m -Xmx512m"
      initContainers:
      - name: fix-permissions
        image: busybox
        command: ["sh", "-c", "chown -R 1000:1000 /usr/share/elasticsearch/data"]
        volumeMounts:
        - mountPath: "/usr/share/elasticsearch/data"
          name: es02
       - name: increase-vm-max-map
         image: busybox
         command: ["sysctl", "-w", "vm.max_map_count=262144"]
         securityContext:
           privileged: true
       - name: increase-fd-ulimit
         image: busybox
         command: ["sh", "-c", "ulimit -n 65536"]
         securityContext:
           privileged: true
       volumes:
       - name: es02
         persistentVolumeClaim:
           claimName: es02pvc
kubectl create -f elk.yamlkubectl get pods
Step5:
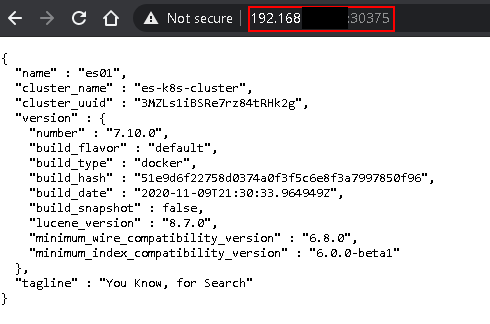
Try connection elasticsearch with your worker node ip and node port.
kubectl get svc
Kibana Install On Kubernetes
To install kibana on kubernetes cluster, you should follow commands below.
Step1:
Create kibana pv and pvc file to create pv and pvc of kubernetes resources. Before you should create mount folder on worker node.
mkdir -p /opt/elasticsearch/kibanavim kibanapvpvc.yamlapiVersion: v1
kind: PersistentVolumeClaim
metadata:
name: kibanapvc
spec:
accessModes:
- ReadWriteOnce
resources:
requests:
storage: 1Gi
---
apiVersion: v1
kind: PersistentVolume
metadata:
name: kibanapv
labels:
type: local
spec:
capacity:
storage: 1Gi
accessModes:
- ReadWriteOnce
hostPath:
path: "/opt/elasticsearch/kibana"kubectl create -f kibanapvpvc.yamlStep2:
Create kibana yaml file to crate deployment resources of kubernetes and add your elasticsearch ip address and node port number in yaml file relavant place.
vim kibana.yamlapiVersion: apps/v1
kind: Deployment
metadata:
name: kibana
labels:
app: kibana
spec:
replicas: 1
selector:
matchLabels:
app: kibana
template:
metadata:
labels:
app: kibana
spec:
containers:
- name: kibana
image: docker.elastic.co/kibana/kibana:7.10.0
resources:
limits:
cpu: 1000m
requests:
cpu: 200m
ports:
- name: req
containerPort: 5601
protocol: TCP
env:
- name: ELASTICSEARCH_HOSTS
value: http://192.168.0.0:30375
volumeMounts:
- mountPath: "/etc"
name: kibana
volumes:
- name: kibana
persistentVolumeClaim:
claimName: kibanapvckubectl create -f kibana.yamlStep3:
Create service file to create service resources of kubernetes.
vim kibanasvc.yamlapiVersion: v1
kind: Service
metadata:
name: kibana
labels:
app: kibana
spec:
ports:
- port: 5601
protocol: TCP
selector:
app: kibana
type: NodePort kubectl create -f kibanasvc.yamlStep5:
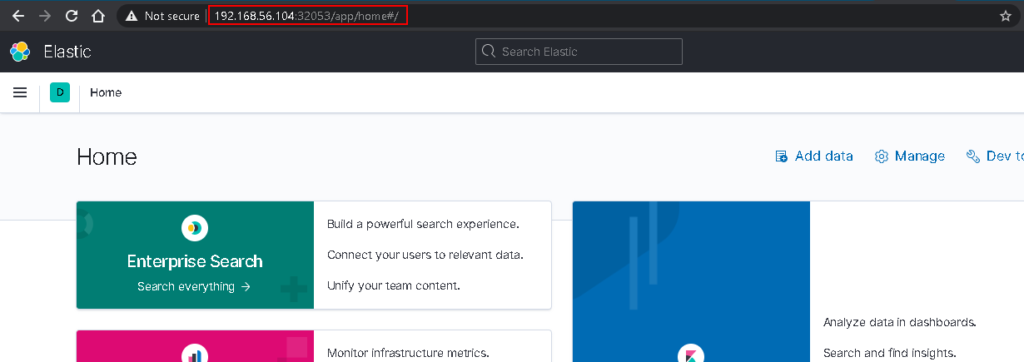
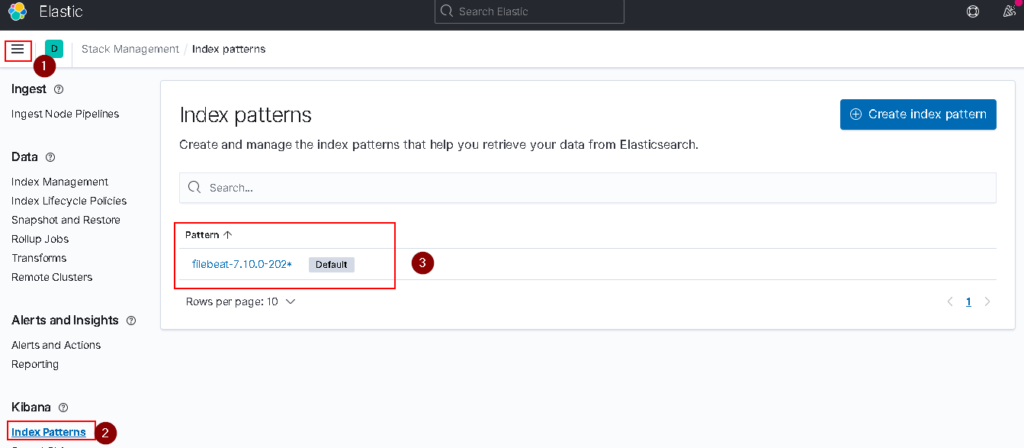
List your all services and take your nodeport number of kibana and connect kibana interface with your worker node ip and port number of node port.
kubectl get svc

Filebeat Install On Kubernetes
We will install the filebeat applicaiton on kubernetes cluster to send cluster logs on elasticsearch. After this installation we can see applcaition logs on kibana because we set kibana and elasticsearch integration. We need service account, cluster role, cluster role binding, pv ,pvc and config map resources of kubernetes. To installation we will explain steps below.
Step 1:
Create cluster role yaml file.
vim filebeatcr.yamlapiVersion: rbac.authorization.k8s.io/v1
kind: ClusterRole
metadata:
name: filebeat
labels:
app: filebeat
rules:
- apiGroups: [""] # "" indicates the core API group
resources:
- namespaces
- pods
verbs:
- get
- watch
- list kubectl create -f filebeatcr.yamlStep 2:
Create cluster role binding to binding roles for service account
vim filebeatcrb.yamlapiVersion: rbac.authorization.k8s.io/v1
kind: ClusterRoleBinding
metadata:
name: filebeat
subjects:
- kind: ServiceAccount
name: filebeat
namespace: kube-system
roleRef:
kind: ClusterRole
name: filebeat
apiGroup: rbac.authorization.k8s.io kubectl crate -f filebeatcrb.yamlStep 3:
Create service account resources of kubernetes.
vim filebeatsa.yamlapiVersion: v1
kind: ServiceAccount
metadata:
name: filebeat
namespace: kube-system
labels:
app: filebeatkubectl create -f filebeatsa.yamlStep 4:
Create config map for configuration filebeat. Also you must write your elasticsearch worker node ip address and node port number in congfig map yaml file marked(Elastic host and port ) place.
vim filebeatcm.yamlapiVersion: v1
kind: ConfigMap
metadata:
name: filebeat-config
namespace: kube-system
labels:
k8s-app: filebeat
data:
filebeat.yml: |-
filebeat.inputs:
- type: container
paths:
- /var/log/containers/*.log
processors:
- add_kubernetes_metadata:
host: ${NODE_NAME}
matchers:
- logs_path:
logs_path: "/var/log/containers/"
processors:
- add_cloud_metadata:
- add_host_metadata:
cloud.id: ${ELASTIC_CLOUD_ID}
cloud.auth: ${ELASTIC_CLOUD_AUTH}
output.elasticsearch:
hosts: ['${ELASTICSEARCH_HOST:YOUR ELASTİCSEARCH NODE IP ADRESS}:${ELASTICSEARCH_PORT:YOUR NODE PORT FOR ELASTİCSEARCH}']
# username: ${ELASTICSEARCH_USERNAME}
# password: ${ELASTICSEARCH_PASSWORD}kubectl create -f filebeatcm.yamlStep 5:
Create pv and pvc resources of kubernetes. Before create pv and pvc resources you should create mount folder on worker node.
mkdir /opt/filebeat/logsvim filebeatpvpvc.yamlapiVersion: v1
kind: PersistentVolume
metadata:
name: filebeat
labels:
type: local
spec:
capacity:
storage: 1Gi
accessModes:
- ReadWriteOnce
hostPath:
path: "/opt/filebeat/logs"
---
apiVersion: v1
kind: PersistentVolumeClaim
metadata:
name: filebeatpvc
spec:
accessModes:
- ReadWriteOnce
resources:
requests:
storage: 1Gikubectl create -f filebeatpvpvc.yamlStep 6:
Create filebeat application yaml file and write your elasticsearch ip address and your node port number. If you want create pod in your master node you must add toleration in yaml file. I did not add toleration but if you add, will be good to see master node components logs.
apiVersion: apps/v1
kind: DaemonSet
metadata:
  name: filebeat
  namespace: kube-system
  labels:
    app: filebeat
spec:
  selector:
    matchLabels:
      app: filebeat
  template:
    metadata:
      labels:
        app: filebeat
    spec:
      serviceAccountName: filebeat
      terminationGracePeriodSeconds: 30
      hostNetwork: true
      dnsPolicy: ClusterFirstWithHostNet
      containers:
      - name: filebeat
        image: docker.elastic.co/beats/filebeat:7.10.0
        args: [
          "-c", "/etc/filebeat.yml",
          "-e",
        ]
        env:
        - name: ELASTICSEARCH_HOST
          value: ELASTICSEARH IP ADDRESS
        - name: ELASTICSEARCH_PORT
          value: "ELASTICSEARCH NODEPORT"
      #  - name: ELASTICSEARCH_USERNAME
      #    value: elastic
      #  - name: ELASTICSEARCH_PASSWORD
      #    value: changeme
        - name: ELASTIC_CLOUD_ID
          value:
        - name: ELASTIC_CLOUD_AUTH
          value:
        - name: NODE_NAME
          valueFrom:
            fieldRef:
              fieldPath: spec.nodeName
        securityContext:
         runAsUser: 0
          # If using Red Hat OpenShift uncomment this:
          #privileged: true
        resources:
          limits:
            memory: 200Mi
          requests:
            cpu: 100m
            memory: 100Mi
        volumeMounts:
        - name: config
          mountPath: /etc/filebeat.yml
          readOnly: true
          subPath: filebeat.yml
        - name: data
          mountPath: /usr/share/filebeat/data
        - name: varlibdockercontainers
          mountPath: /var/lib/docker/containers
          readOnly: true
        - name: varlog
          mountPath: /var/log
          readOnly: true
      volumes:
      - name: config
        configMap:
          defaultMode: 0640
          name: filebeat-config
      - name: varlibdockercontainers
        hostPath:
          path: /var/lib/docker/containers
      - name: varlog
        hostPath:
          path: /var/log
       # data folder stores a registry of read status for all files, so we don't send everything again on a Filebeat pod restart
      - name: data
        hostPath:
          # When filebeat runs as non-root user, this directory needs to be writable by group (g+w).
          path: /var/lib/filebeat-data
          type: DirectoryOrCreate
kubectl create -f filebeat.yamlStep 7:
Check your pods and logs on kibana.

REDIS CLUSTER INSTALL ON KUBERNETES
Redis cluster installation on kubernetes will explain under this topic. To do this we will use statefulset resource of kubernetes, local storage class, service, configmap and persistent volume. We have to create this resources in order.
Step1:
Create localstorage in kubernetes cluster.
vim redis-stclass.yamlapiVersion: storage.k8s.io/v1
kind: StorageClass
metadata:
name: redis-storage
provisioner: kubernetes.io/no-provisioner
volumeBindingMode: WaitForFirstConsumerkubectl create -f redis-stclass.yamlStep2:
Create volume folder on worker node.This installation done on a cluster with one master and one worker node. So we will create folder on one worker node. If you have a multiple worker node you must create folder each node or you must use node slector and create folder slected worker node.
Go worker node and create volume folder.
cd /opt
mkdir Redis && cd Redis
mkdir Redis01 Redis02 Redis03 Redis04 Redis05 Redis06Go to master node and continue to installation.
vim redis-pv.yamlapiVersion: v1
kind: PersistentVolume
metadata:
name: redispv01
labels:
type: local01
spec:
storageClassName: "redis-storage"
capacity:
storage: 1Gi
accessModes:
- ReadWriteOnce
hostPath:
path: "/opt/Redis/Redis01"
---
apiVersion: v1
kind: PersistentVolume
metadata:
name: redispv02
labels:
type: local02
spec:
storageClassName: "redis-storage"
capacity:
storage: 1Gi
accessModes:
- ReadWriteOnce
hostPath:
path: "/opt/Redis/Redis02"
---
apiVersion: v1
kind: PersistentVolume
metadata:
name: redispv03
labels:
type: local03
spec:
storageClassName: "redis-storage"
capacity:
storage: 1Gi
accessModes:
- ReadWriteOnce
hostPath:
path: "/opt/Redis/Redis03"
---
apiVersion: v1
kind: PersistentVolume
metadata:
name: redispv04
labels:
type: local04
spec:
storageClassName: "redis-storage"
capacity:
storage: 1Gi
accessModes:
- ReadWriteOnce
hostPath:
path: "/opt/Redis/Redis04"
---
apiVersion: v1
kind: PersistentVolume
metadata:
name: redispv05
labels:
type: local05
spec:
storageClassName: "redis-storage"
capacity:
storage: 1Gi
accessModes:
- ReadWriteOnce
hostPath:
path: "/opt/Redis/Redis05"
---
apiVersion: v1
kind: PersistentVolume
metadata:
name: redispv06
labels:
type: local06
spec:
storageClassName: "redis-storage"
capacity:
storage: 1Gi
accessModes:
- ReadWriteOnce
hostPath:
path: "/opt/Redis/Redis06"kubectl create -f redis-pv.yamlStep3:
Create configmap to setup cluster.
vim redis-configmap.yamlapiVersion: v1
kind: ConfigMap
metadata:
name: redis-cluster
data:
update-node.sh: |
#!/bin/sh
REDIS_NODES="/data/nodes.conf"
sed -i -e "/myself/ s/[0-9]{1,3}.[0-9]{1,3}.[0-9]{1,3}.[0-9]{1,3}/${POD_IP}/"${REDIS_NODES}
exec "$@"
redis.conf: |+
cluster-enabled yes
cluster-require-full-coverage no
cluster-node-timeout 15000
cluster-config-file /data/nodes.conf
cluster-migration-barrier 1
appendonly yes
protected-mode nokubectl create -f redis-configmap.yamlStep4:
Create service resources to connect each redis instances.
vim redis-svc.yamlapiVersion: v1
kind: Service
metadata:
name: redis-cluster
labels:
app: redis-cluster
spec:
ports:
- port: 6379
name: rest
protocol: TCP
- port: 16379
name: gossip
protocol: TCP
selector:
app: redis-cluster kubectl create -f redis-svc.yamlStep5:
Creaete statefulset to deploy redis application.
vim redis.yamlapiVersion: apps/v1
kind: StatefulSet
metadata:
name: redis-cluster
spec:
serviceName: redis-cluster
replicas: 6
selector:
matchLabels:
app: redis-cluster
template:
metadata:
labels:
app: redis-cluster
spec:
containers:
- name: redis
image: redis:5.0.7-alpine
ports:
- containerPort: 6379
name: client
- containerPort: 16379
name: gossip
command: ["/conf/update-node.sh", "redis-server", "/conf/redis.conf"]
env:
- name: IP
valueFrom:
fieldRef:
fieldPath: status.podIP
volumeMounts:
- name: conf
mountPath: /conf
readOnly: false
- name: data
mountPath: /data
readOnly: false
volumes:
- name: conf
configMap:
name: redis-cluster
defaultMode: 0755
volumeClaimTemplates:
- metadata:
name: data
spec:
accessModes: [ "ReadWriteOnce" ]
storageClassName: "redis-storage"
resources:
requests:
storage: 1Gi Step6:
Initiate cluster with script. You can find script in this repository also you can clone or downloand repository in your machine to create all resources, then you can use initiate-script to create redis-cluster.
git clone https://github.com/hafifbilgiler/KUBERNETES.gitcd KUBERNETES/APPLICATIONS/REDISsh initiate-cluster.sh1)Make sure your pods with use 1 section.
2)İnitiate cluster with use 2 section. After you can try other section.

If I have enough time, I will continue to write.
No responses yet