
See Our Product
Installation of elasticsearch and kibana will explain under this topic.
Step1:
Create new service account and give privileged permission for this service account. We will use this service account in the containers to run specific commands that needs the root permission. And we will use the statefulset for elasticsearch installation.
oc adm policy add-scc-to-user privileged system:serviceaccount:<your_namespace_name>:privileged-sa oc create serviceaccount privileged-sa -n <your_namespace_name>Step2:
Add Tag your image and create image pull secret. We have been tagged image for nexus repository . If you use the internal registry you have not to use image pull secret, just you must pull the image from docker repository image and add the new tag then push the image internal registry of openshift. I added all commands for image pulling and tagging on the below code space.
docker pull docker.elastic.co/elasticsearch/elasticsearch:7.16.2
docker pull busybox
docker pull docker.elastic.co/kibana/kibana:7.16.2
docker tag docker.elastic.co/elasticsearch/elasticsearch:7.16.2 <your_nexus_repository_address:port>/repository/<your_repository_name>/elasticsearch:7.16.2
docker tag busybox <your_nexus_repository_address:port>/repository/<your_repository_name>/busybox
docker tag docker.elastic.co/kibana/kibana:7.16.2 <your_nexus_repository_address:port>/repository/<your_repository_name>/kibana:7.16.2
oc create secret docker-registry openshift-image-registry-nexus --docker-server=<your_nexus_repository_address:port> --docker-username=<nexus_user_username> --docker-password=<password> --docker-email=email@email.com.trStep3:
Create service resources to access and establish the new connection between pods.
vim elk_svc.yamlapiVersion: v1
kind: Service
metadata:
name: es-cluster
labels:
app: es-cluster
spec:
selector:
app: es-cluster
clusterIP: None
ports:
- port: 9200
name: req
- port: 9300
name: inter-nodeoc apply -f elk_svc.yamlStep4:
Create the application yaml file like below and edit the related field for your environment.
vim elk.yamlapiVersion: apps/v1
kind: StatefulSet
metadata:
name: es-cluster
namespace: <your_namespace_name>
labels:
app: es-cluster
app.kubernetes.io/name: elasticsearch
app.kubernetes.io/instance: elasticsearch-01
app.kubernetes.io/version: "7.16.2"
app.kubernetes.io/component: indexingandsearch
app.kubernetes.io/part-of: logging
app.kubernetes.io/managed-by: kubectl
app.kubernetes.io/created-by: hands
spec:
serviceName: es-cluster
replicas: 3
selector:
matchLabels:
app: es-cluster
template:
metadata:
labels:
app: es-cluster
spec:
serviceAccountName: privileged-sa
containers:
- name: es-cluster
image: <your_nexus_repository_address:port>/repository/<your_repository_name>/elasticsearch:7.16.2
securityContext:
privileged: true
resources:
limits:
memory: "2Gi"
cpu: 1000m
requests:
cpu: 400m
memory: "1500Mi"
readinessProbe:
httpGet:
scheme: HTTP
path: /_cluster/health?local=true
port: 9200
initialDelaySeconds: 5
ports:
- containerPort: 9200
name: req
protocol: TCP
- containerPort: 9300
name: inter-node
protocol: TCP
volumeMounts:
- name: data
mountPath: /usr/share/elasticsearch/data
env:
- name: cluster.name
value: es-cluster-ocp
- name: node.name #get node name from metadata of pods.
valueFrom:
fieldRef:
fieldPath: metadata.name
- name: discovery.seed_hosts
value: "es-cluster-0.es-cluster,es-cluster-1.es-cluster,es-cluster-2.es-cluster" # The pods can solve the redis pod aip address with podname.svc name default dns name of the pod: podname.namespace.service.svc.cluster.local
- name: cluster.initial_master_nodes
value: "es-cluster-0,es-cluster-1,es-cluster-2"
- name: ES_JAVA_OPTS
value: "-Xms1024m -Xmx1024m"
- name: xpack.security.enabled
value: "false"
- name: bootstrap.memory_lock
value: "false"
initContainers:
- name: fix-permissions
image: <your_nexus_repository_address:port>/repository/<your_repository_name>/busybox
command: ["sh", "-c", "chown -R 1000:1000 /usr/share/elasticsearch/data"]
securityContext:
privileged: true
volumeMounts:
- name: data
mountPath: /usr/share/elasticsearch/data
- name: increase-vm-max-map
image: <your_nexus_repository_address:port>/repository/<your_repository_name>/busybox
command: ["sysctl", "-w", "vm.max_map_count=262144"]
securityContext:
privileged: true
- name: increase-fd-ulimit
image: <your_nexus_repository_address:port>/repository/<your_repository_name>/busybox
command: ["sh", "-c", "ulimit -n 65536"]
securityContext:
privileged: true
volumeClaimTemplates:
- metadata:
name: data
labels:
app: es-cluster
spec:
accessModes: [ "ReadWriteOnce" ]
storageClassName: "st-class-name"
resources:
requests:
storage: 10Gioc create -f elk.yamlStep5:
Create persistent volume claim for kibana.
vim kibana_pvc.yamlapiVersion: v1
kind: PersistentVolumeClaim
metadata:
name: kibana-pvc
namespace: <your_namespace_name>
spec:
accessModes:
- ReadWriteOnce
resources:
requests:
storage: 1Gi
oc apply -f kibana_pvc.yamlStep6:
Create kibana service to access the kibana dashboard and interface.
vim kibana_svc.yamlapiVersion: v1
kind: Service
metadata:
name: kibana
namespace: <your_namespace_name
labels:
app: kibana
spec:
ports:
- port: 5601
protocol: TCP
selector:
app: kibana
oc apply -f kibana_svc.yamlStep7:
Create deployment file to deploy the application.
vim kibana.yamlapiVersion: apps/v1
kind: Deployment
metadata:
name: kibana
namespace: <your_namespace_name>
labels:
app: kibana
app.kubernetes.io/name: kibana
app.kubernetes.io/instance: kibana-01
app.kubernetes.io/version: "7.16.2"
app.kubernetes.io/component: monitoring
app.kubernetes.io/part-of: logging
app.kubernetes.io/managed-by: kubectl
app.kubernetes.io/created-by: hands
spec:
replicas: 1
selector:
matchLabels:
app: kibana
template:
metadata:
labels:
app: kibana
spec:
containers:
- name: kibana
image: <your_nexus_repository_address:port>/repository/<your_repository_name>/elasticsearch:7.16.2
resources:
limits:
cpu: 1000m
requests:
cpu: 200m
ports:
- name: req
containerPort: 5601
protocol: TCP
env:
- name: ELASTICSEARCH_HOSTS
value: http://your_elasticsearch_cluster_ip:9200
volumeMounts:
- mountPath: "/etc"
name: kibana
volumes:
- name: kibana
persistentVolumeClaim:
claimName: kibana-pvc
imagePullSecrets:
- name: <your_image_registry_secret_name>
oc apply -f kibana.yamlStep8:
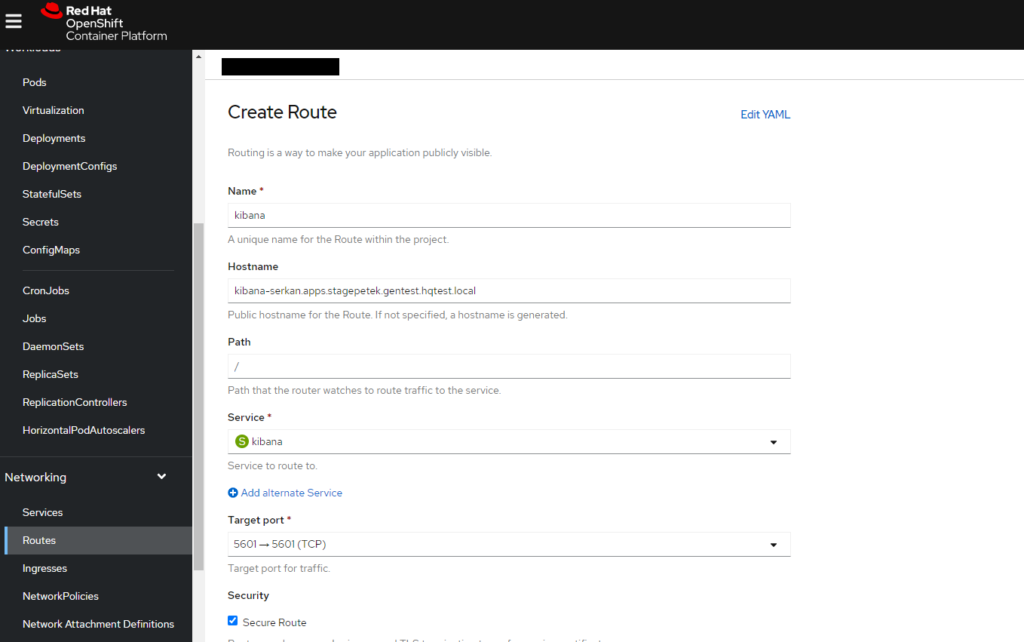
Create Route to access the kibana and dash board vith openshift interface.
That’s it, have good works!!!
2 Responses
oncelikle yazmiş olduğunuz teknik adımlar google de bir tek burada mevcut.
kibana.yml de image de elasticsearch image kullanılmış sanırım yazı hatasi oldu orada.
elasticsearch image yerine kibana nin image olmalıydı. teşekkurler
image: /repository//elasticsearch:7.16.2
yerine
image: /repository//kibana:7.16.2
bu dokuman kullnarak kurmak isteyen olursa diye yorum yazdim 🙂
Merhabalar,
Haklısınız, hjatalı olmuş çok teşeşkkür ederim yardımınız için:)
Teşekkürler.